This article explains how to apply actions to your contacts in ClickFunnels, including using bulk actions for managing multiple contacts at once. By performing these actions, you can efficiently manage your audience.
Requirements
An active ClickFunnels account
Existing Contacts
Select Contacts
To perform actions on your contacts, the first step is selecting which contacts you want to manage.
Click Customers > Contacts from the left-hand main menu.
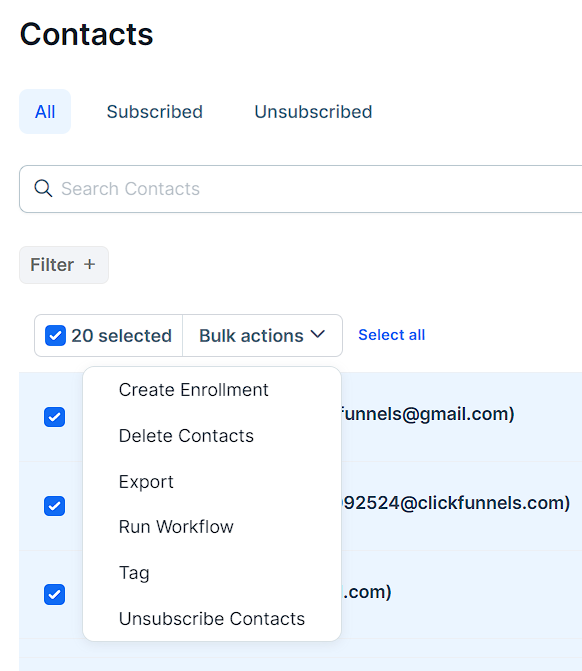
Check the box next to each contact you want to manage.
Once your contacts are selected:
For single contacts, click Actions to manage that contact.
For multiple contacts, click Bulk Actions to apply changes to all selected contacts at once.
Create Enrollment
The Create Enrollment action allows you to manually enroll one or more contacts into a course. You can do this immediately or schedule it for a future date.
Click Create Enrollment from the Actions or Bulk Actions menu.
Select the course you’d like to enroll the contact(s) in.
Click Save to enroll immediately, or check the Schedule box to set a future date for enrollment, then click Save to confirm.
To learn more about course enrollments, refer to the Managing Course Enrollment article.
Delete Contacts
The Delete Contacts action enables you to remove multiple contacts at once. However, note that contacts with active orders, subscriptions, or course enrollments cannot be deleted until those conditions are resolved.
Choose Delete Contacts from the Actions or Bulk Actions menu.
Click Delete Contacts in the pop-up side window, then type DELETE to confirm in the popup window. Eligible contacts will be deleted immediately.
Handling Failed Deletions:
If any contacts cannot be deleted (e.g., due to active subscriptions, course enrollments, or orders), they will appear in the Failed Contacts section after the delete action is processed. To view these failed deletions:
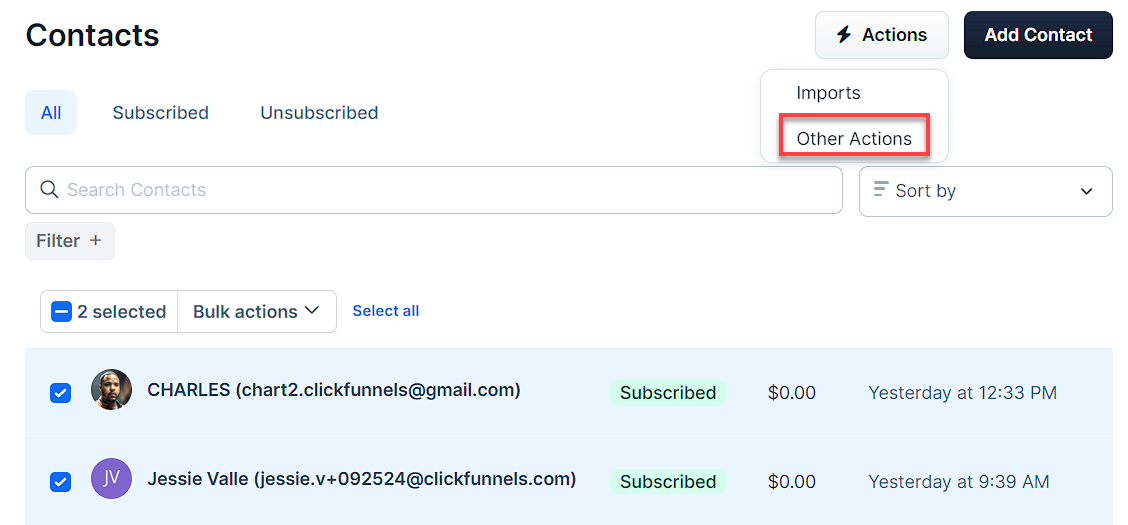
At the top right of the Contacts page, click the Actions button, then select Other Actions.
Navigate to the Deletions tab, where you can view the details of the deletion process.
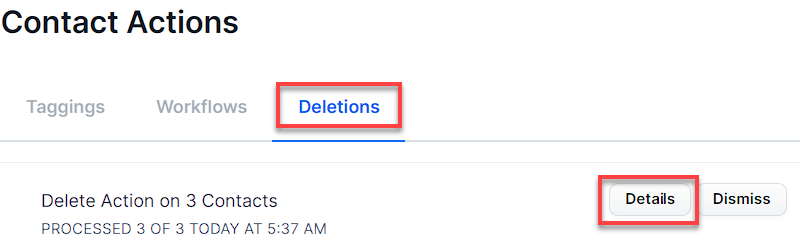
Any failed contacts will be listed along with the reason for failure. Contacts with active orders cannot be deleted. For contacts enrolled in courses, click on the failed contact’s email to manage enrollments.
Remove the enrollment, and then you can attempt to delete the contact again.
Remove Delete Action:
If you no longer want the delete action to appear in the list, click Remove Delete Action. This only removes the action from the list and does not affect the contacts themselves. Click Proceed to confirm.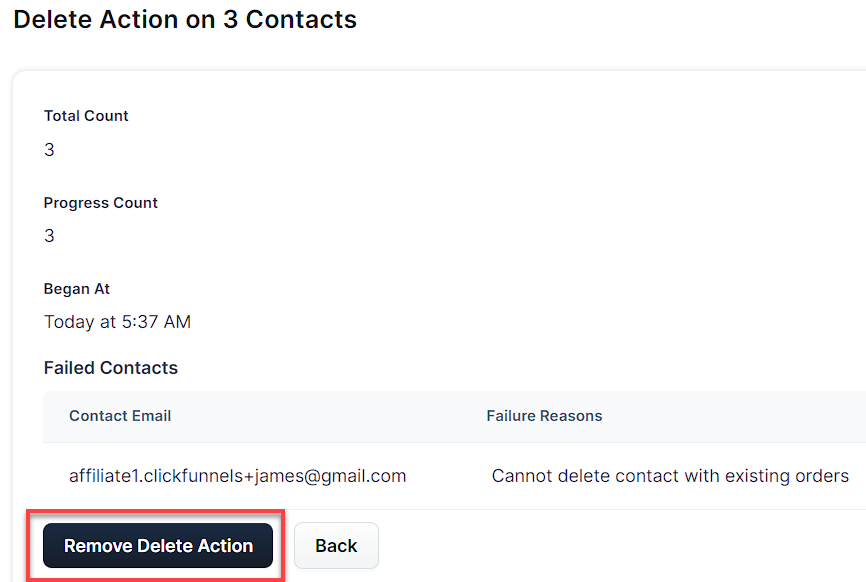
Export Contacts
Using the Export option, you can export selected contact data into a CSV file. This feature is helpful for creating backups, generating reports, or transferring contact data to another platform.
Click Export from the Actions or Bulk Actions menu.
Choose the fields to export. You can also include custom fields if necessary.
Contacts will be exported immediately by default. If you prefer to export at a later time, check the Schedule box to set a future export date.
Click Create export action.
For more detailed steps on exporting contacts, visit the How to Export Contacts article.
Run Workflow
The Run Workflow action allows you to add contacts to a Workflow, automating processes like follow-up emails, tagging, and other actions.
Click Run Workflow from the Actions or Bulk Actions menu.
Select the Workflow you want to apply.
If needed, check the Force Run box to override default Workflow settings and run it immediately.
Click Perform Run Workflow Action to start the Workflow.
To learn more about creating workflows, check our How to Create a Workflow article.
Tag Contacts
Tags help you categorize your contacts, making it easier to segment your audience for personalized marketing efforts or campaigns. With the Tag action, you can add or remove tags from your contacts.
Click Tag from the Actions or Bulk Actions menu.
Select whether to Add or Remove a tag, then choose the relevant tag.
The tag will be applied immediately. To schedule the tagging process for later, check the Schedule box and select a date.
Click Perform tag action.
Unsubscribe Contacts
The Unsubscribe Contacts option allows you to remove contacts from marketing communications without deleting them permanently.
Click Unsubscribe Contacts from the Actions or Bulk Actions menu.
Confirm the unsubscribe action in the new side menu that appears.
Type UNSUBSCRIBE to confirm, then click Proceed.