A “Product Collection” in ClickFunnels allows you to group products together, creating a more organized and efficient shopping experience for your customers. A “Product Collection” is not just a category of similar products; it can be a powerful tool to offer bundled solutions or tiered packages to meet different customer needs. In this article, you will learn how to create a new “Product Collection”, add products, edit existing collections, and manage them effectively in ClickFunnels.
.png)
IMPORTANT
Product collections are exclusively available for sale in the ClickFunnels store. They cannot be added as individual products within a funnel.
Requirements
An active ClickFunnels account
What is a Product Collection?
A “Product Collection” is a curated group of products that are displayed together in your store. This feature goes beyond simply categorizing products; it enables you to create customized bundles and packages that cater to various customer needs.
Example - Fitness Equipment Store:
Imagine you own a fitness equipment store. You have a variety of products, including treadmills, dumbbells, yoga mats, and resistance bands. Instead of just listing all these products together, you can create different product collections to cater to different customer needs:
Home Gym Essentials: This collection could include dumbbells, resistance bands, yoga mats, and a small exercise bench.
Cardio Workout Collection: Here, you might include treadmills, stationary bikes, and jump ropes.
Strength Training Bundle: This collection could feature barbells, weight plates, and power racks.
Beginner Fitness Kit: A collection of basic equipment for those just starting their fitness journey, including a mat, resistance bands, and a jump rope.
By creating these collections, you make it easier for customers to find the products they need and encourage them to explore related items. It also allows you to create targeted marketing campaigns based on these collections.
When to Use Product Collections in the Store
“Product Collections” can be used in various business scenarios to enhance customer experience and streamline product management. Here are some possible scenarios:
Seasonal Collections: During holidays or special seasons, create collections featuring holiday-themed products or seasonal offers. Example: A “Holiday Gift Set” collection for Christmas that includes various gift-worthy products.
Product Bundles: Group related products into a bundle to offer a complete solution. Example: A “Home Office Setup” collection that includes a desk, chair, and office supplies.
Service Packages: Offer different tiers of service packages. Example: A marketing agency can create collections for “Basic”, “Standard”, and “Premium” service packages.
Cross-Selling Opportunities: Encourage customers to purchase related items together. Example: A fashion retailer can create a “Complete Outfit” collection that includes clothing, shoes, and accessories.
New Arrivals or Featured Products: Highlight new or featured products in a dedicated collection. Example: A tech store can have a “New Arrivals” collection showcasing the latest gadgets and accessories.
Discounted or Clearance Items: Group products on sale or clearance into a collection. Example: A store can create a “Clearance Sale” collection for products that are discounted.
Create a New Collection
In the left side navigation menu, click on Products, then select Collections from the submenu.
.png)
Click on Create Collection at the top right of the Collections page.
Enter the collection’s Name, Description, and add an Image.
Check the Online Store checkbox if you want the collection to be visible in your online store.
Click on Show next to Advanced Settings if you want to override the default collection template. Click Override template page to select a specific page template to be used exclusively for this collection. Note that the selected page template will only apply to this particular collection and will not affect the store’s default collection page template.
Click Create Collection to save your new collection.
Set Up a Product Collection
Once you have created a new collection, follow these steps to set it up:
Collection Information
Name: Enter the name of the collection.
Description: Provide a detailed description of the collection.
Collection Image: Add an image that represents the collection. You can click on Change image to upload a new image or Remove to delete the current image.
Visibility: Check the Online Store checkbox if you want the collection to be visible in your online store.
Collection Type
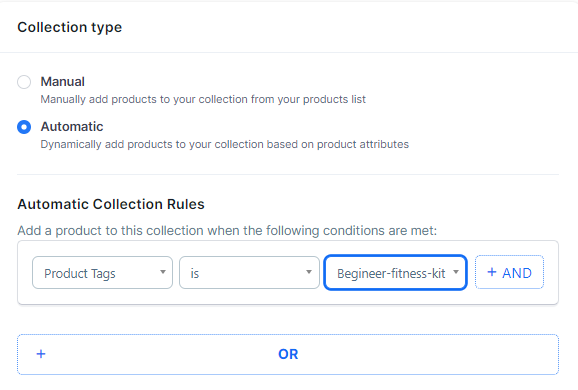
Manual: Opt for this setting if you prefer to individually select and add products to your collection from your existing product list.
Automatic: This setting allows products to be automatically included in the collection based on defined criteria, such as product tags, price ranges, or visibility status. Utilizing the Automatic option is particularly advantageous when handling a substantial inventory.
For example, if you are selling Beginner Fitness Equipment and add a new product to the list, you won’t need to add the product manually. By using filter criteria, it will be added automatically to the collection. This is extremely useful for a collection with a large number or variety of products.
To implement this:
Click on “Create a Filter” to define the conditions for automatic inclusion. For example, setting a filter for products with tags will ensure all relevant products are included in the specified collection automatically.
Collection Sort Method
Control the order in which the products in this collection will be displayed to your customers. You can sort the products in the following ways:
Sort manually: This allows you to drag and drop products to arrange them in your preferred order.
Name (A-Z): Products will be sorted alphabetically from A to Z.
Name (Z-A): Products will be sorted alphabetically from Z to A.
Price (highest to lowest): Products will be sorted by price, from highest to lowest.
Price (lowest to highest): Products will be sorted by price, from lowest to highest.
Added to collection (most recent first): Products will be sorted by the date they were added to the collection, with the most recent additions appearing first.
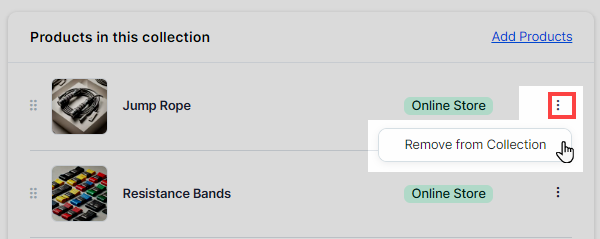
Products in this Collection
Add Products: Click on Add Products to select products from your existing product list to include in this collection. Check the checkboxes next to the products you want to add and click Update.

Remove Products: Click the three-dot icon next to any product and click Remove from Collection option to remove a product from the collection.
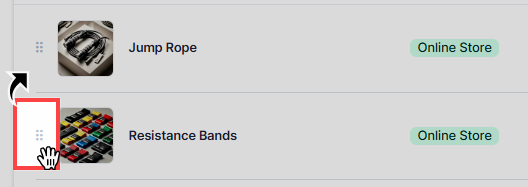
Manually Sorting Products: If you have selected the soring method as “Sort Manually” then you can use the “drag” icon to change the product position up and down. The product in the top will be counted as the first product in the collection and the product in the bottom will be counted as the last product in the collection.
SEO & Sharing
Configure how search engines and social networks read and display information about your collection. Click on Edit SEO and Sharing and update the following details:
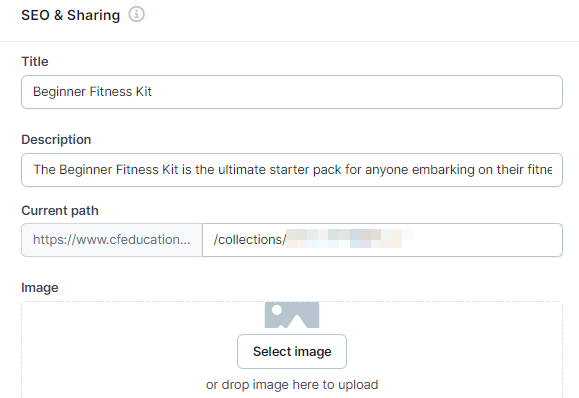
Title: Enter a title for the collection page.
Description: Provide a brief description of the collection for SEO purposes.
Current Path: Specify the URL path for the collection page.
Image: Add an image that will be displayed when the collection page is shared on social media.
Remove an Existing Collection
In the left side navigation menu, click on Products, then select Collections from the submenu.
Locate the collection you want to remove and click on the name of the collection or adjacent gear ⚙️ icon to open the Collection settings.
On the Collection page, scroll down to the bottom of the page.
Click the Archive button.
Confirm the action by clicking the Proceed button.
Restore an Archived Collection
If you have previously archived a collection and wish to restore it, follow these steps:
In the left side navigation menu, click on Products, then select Collections from the submenu.
At the top of the Collections page, click on the Archived tab to view all archived collections.
Locate the collection you want to unarchive. Click the Recycle Bin icon next to the collection name.
.png)
Confirm the action by clicking the Proceed button in the prompt. The collection will be restored to the active collections list.