System emails in ClickFunnels are automated messages triggered by user actions, streamlining communication without the need for custom emails. These emails ensure timely updates, such as order confirmations, fulfillment status, or subscription churn notifications, enhancing the customer experience. This article covers the importance of system emails, how to access them in your workspace, and their various categories.
Requirements
An active ClickFunnels account
Accessing the System Emails in the Workspace
Navigate to the Workspace Settings on the left-hand menu.
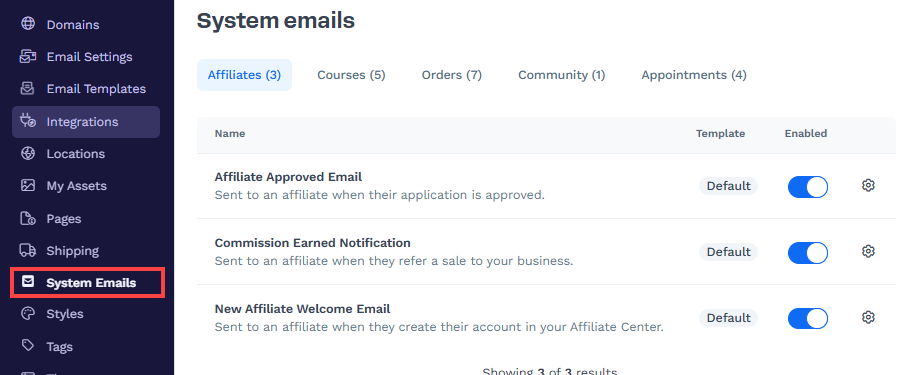
Select System Emails under the Workspace Settings menu.
On the right side, you can browse the categories to view the “system emails” and customize them.
System Email Categories
System emails in ClickFunnels are organized into several categories, each catering to different aspects of user interactions and system events. Below, we explore each category and its sub-categories.
Affiliates
Affiliate Approved Email: Sent to an affiliate when their application is approved.
Commission Earned Notification: Sent to an affiliate when they refer a sale to your business.
New Affiliate Welcome Email: Sent to an affiliate when they create their account in your Affiliate Center.
Courses
Modules Unenrollment Notification: Sent to course members when multiple modules have been removed from their course.
Modules Access Notification: Sent to course members when multiple modules have been added to their course.
Module Access Notification: Sent to course members when a new module has been added to their course.
Module Unenrollment Notification: Sent to course members when a module has been removed from their course.
Course Enrollment Notification: Sent to new course members when they are enrolled in the course.
Orders
Send Invoice to Customer: This email delivers a formal invoice to the customer following their purchase.
Fulfillment Updated Email: Notifies customers when their order fulfillment status is updated. This keeps customers informed about the progress of their order, reducing uncertainty and enhancing trust.
Order Fulfilled Email: This email confirms that the customer’s order has been fulfilled and their items are on the way.
Order Churned Email: For subscription products, this email alerts the customer that their subscription has been churned (expired or canceled).
Order Cancellation Email: If a customer cancels an order, this email notification informs them about the cancellation.
Order Confirmation Email: This email is sent immediately after a customer successfully places an order in your funnel. It typically contains a summary of the purchase details, including product information, pricing, and billing details.
Granted Asset Notification: Alerts customers when access to new assets has been granted, such as digital downloads, ensuring they know how to access their purchased content.
Community
Community Enrollment Notification: Sent to new members when they are granted access to a community, welcoming them and providing information on how to get started, participate, and benefit from community resources.
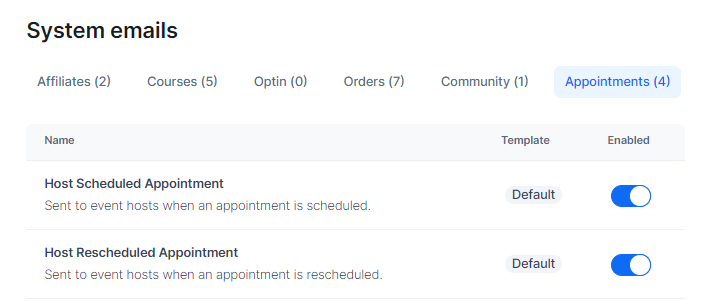
Appointments
Host Scheduled Appointment: Sent to event hosts when an appointment is scheduled, providing them with details about the appointment and ensuring they are prepared.
Host Rescheduled Appointment: Notifies event hosts when an appointment is rescheduled, ensuring they are aware of the change and can adjust their plans accordingly.
Host Canceled Appointment: Informs event hosts when an appointment is canceled, helping them manage their schedule and understand the reason for the cancellation.
Invitee Rescheduled Appointment: Sent to event invitees when an appointment is rescheduled, ensuring they are aware of the new date and time, reducing the chances of missed appointments.
How to Manage System Emails
Managing system emails in ClickFunnels allows you to ensure that your automated messages are aligned with your brand and communication strategy. Here are the steps to effectively manage your system emails:
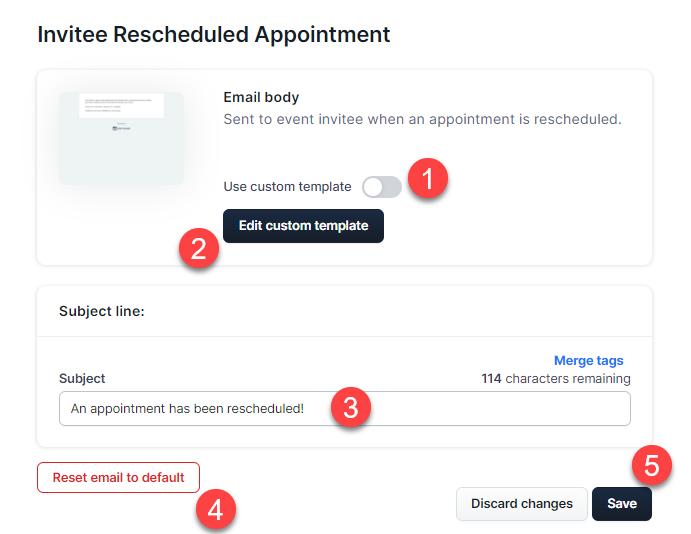
Use Custom Template:
ClickFunnels system emails are provided with a default template and design. To customize the system email with your own edits and designs, toggle the Use custom template switch. This lets you override the default template and incorporate your unique branding and content adjustments.
Customize the Email:
Click on the “Edit Custom Template” button to edit the email content. This allows you to tailor the message to your specific needs.
Edit Default Subject Line:
You can customize the subject line to better fit your brand’s voice or the specific context of the email. You can leave the default subject line unchanged if you prefer to use it. However, if you decide to customize it, consider what key information or tone will best capture the recipient’s attention and convey the message clearly. For example, instead of “An appointment has been rescheduled,” you might use “Your Appointment Has Been Updated!”
Additionally, you can add merge tags in the subject line to personalize the emails. Merge tags dynamically insert information specific to the recipient, such as their name or appointment date, enhancing the email’s relevance and engagement.
Reset Email to Default:
If you have customized the email content and wish to revert to the default template, click the Reset email to default button. This will discard your customizations and restore the original email content and subject line provided by ClickFunnels.
Save Changes:
After making any changes to the email or subject line, ensure you click the Save button to apply the changes. This will update the email settings to reflect your customizations.
How to Customize the System Email Content
ClickFunnels system emails come with pre-built content, but you can customize them to reflect your brand’s voice and messaging better. This ensures your emails align with the overall customer experience you’ve designed. Here’s a breakdown of the customization options:
Open the Editor:
Click the Customize button to open the email in the editor. This brings up the drag-and-drop email builder, where you can modify the content.
Using the Drag-and-Drop Builder:
The editor provides various content blocks, such as text, images, buttons, and more, available on the right side. You can drag these blocks into the email template to customize the layout and content as needed.
Editing HTML with Liquid Syntax:
ClickFunnels includes HTML blocks in the template with code that uses Liquid syntax to generate dynamic content for the email. Each system email serves a specific purpose, and the Liquid syntax will vary accordingly. Here is how it looks in the editor:
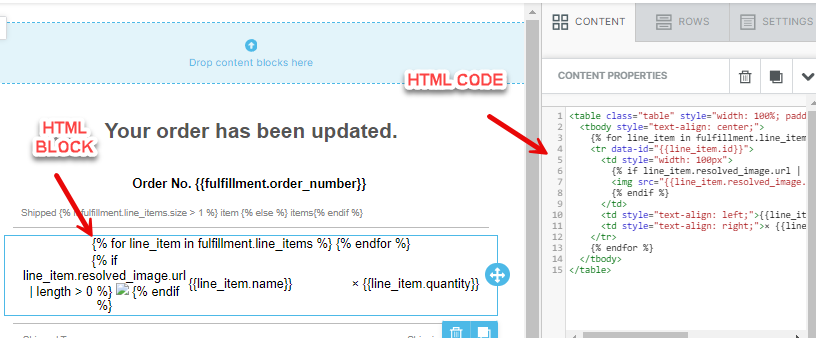
Editing HTML block requires familiarity with HTML and Liquid syntax. If you’re not comfortable with this, consider seeking help from a qualified developer to avoid unintended consequences.
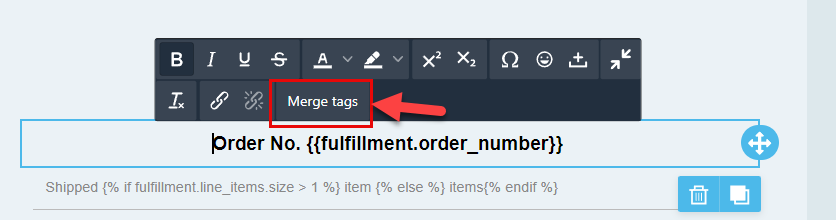
Customize with Merge Tags:
You can enhance the personalization of your emails by using Merge Tags. These tags allow you to insert dynamic information into your emails. To use Merge Tags, click the “Merge Tags” button in the toolbar.
Save Your Changes:
Once you have customized your email content, click Publish and Exit to apply the changes. This ensures that all your edits are preserved.
Reset to Default:
If you edit the HTML content provided by default and decide to revert to the original, you can click the Reset email to default button. This will discard any changes and restore the default email template provided by ClickFunnels.
How to Enable and Disable System Emails
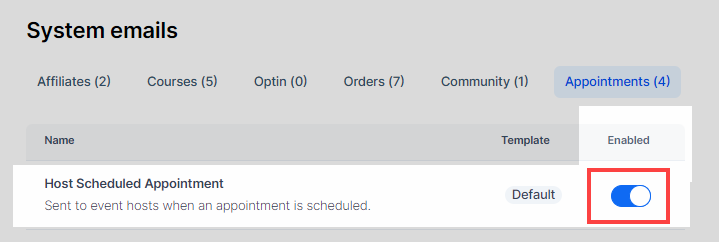
Navigate to System Emails:
Go to Workspace Settings and select System Emails from the menu.
Locate the Email Category:
Find the category of the system email you want to enable or disable, such as Appointments, Orders, or Courses.
Use the Toggle to Enable or Disable:
Each system email has a toggle switch under the Enabled column. To enable an email, ensure the toggle switch is turned on (blue). To disable an email, toggle the switch off (gray). If it is disabled, the system email will not be sent out.
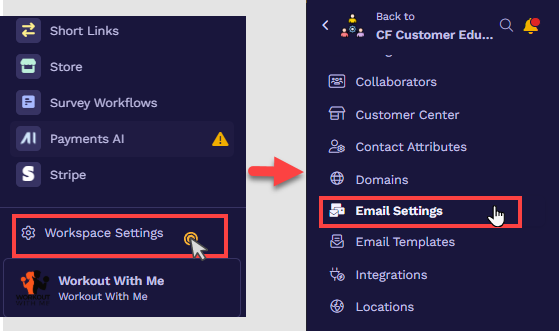
How to Select the Email Address Used to Send System Emails
You can control which email address is used to send system emails from your workspace. This is managed in the General Settings under Email Settings.
Follow these steps to set it up:
Navigate to Workspace Settings on the left side of the navigation.
Select Email Settings.
Scroll to the Company Email Addresses section.
Under System Email Addresses, use the dropdown menu to select your custom email for the From address.
This address will be used as the sender for all system-generated emails, such as order confirmations and appointment notifications.
The email must be added and verified through the Email Addresses tab to appear in the list. Learn more about adding custom emails in the article How to Add a Custom Email Address in ClickFunnels.

In the Reply-to address field, use the dropdown to choose the email where replies should be delivered. This field is optional and can be left blank if you want replies to go to the from address.
When your email domain is associated with an SMTP server, the system emails will not use the custom email address set as “From Email” in the workspace settings under Email Settings. System emails can only utilize a custom email address as “From Email” when the email domain is not linked to an SMTP server. If you don't have one, ClickFunnels will use the default system email address (e.g., no-reply+XXXX@clickfunnelsmail.com) to send system emails. An SMTP can only be used to send marketing emails in the workspace.