The “End” step in ClickFunnels workflows is a crucial feature designed to define the termination points of specific branches within your automated sequences. While a single-branch workflow automatically concludes with an “End of Workflow” marker, multi-branch workflows require more careful management to ensure that each branch stops appropriately. The “End” step allows you to close off specific branches, preventing contacts from rejoining the main workflow after completing a branch, which is essential for maintaining the integrity and logic of your automation.
Requirements
An active ClickFunnels account
You have “conditional split paths” or “split test paths” in the workflow
Understanding Single and Multiple Branch Workflows
When working with workflows in ClickFunnels, it’s important to understand the difference between single and multiple branch workflows:
Single Branch Workflow
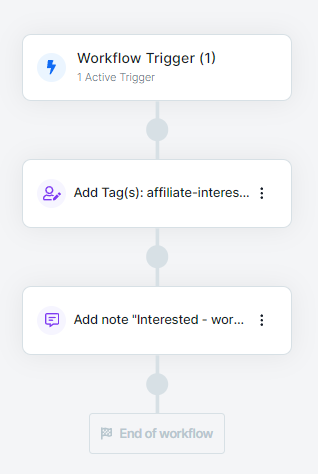
A single branch workflow consists of a linear path where contacts follow one sequence of steps from start to finish. In such workflows, the End of Workflow marker is automatically placed at the conclusion, eliminating the need for an additional “End” step.
Multiple Branch Workflow
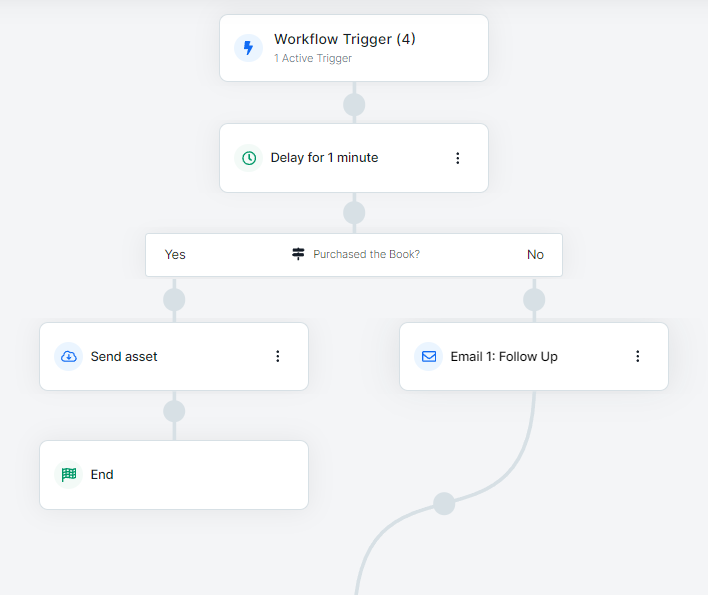
A multiple branch workflow can be created using steps like the “Conditional Split Path” or the “Split Test” step, which involves contacts diverging into different branches based on specific conditions or for A/B testing purposes. In these cases, the “End” step becomes crucial to ensure that each branch terminates correctly. By adding the “End” step, you prevent contacts from returning to the main branch after completing a sub-branch, thereby maintaining the logical flow of the workflow.
Adding the “End” Step to Your Workflow
Open Your Workflow:
From your ClickFunnels dashboard, navigate to the Automations » Workflows menu.
Open an existing workflow or create a new one.
Add the “End” Step:
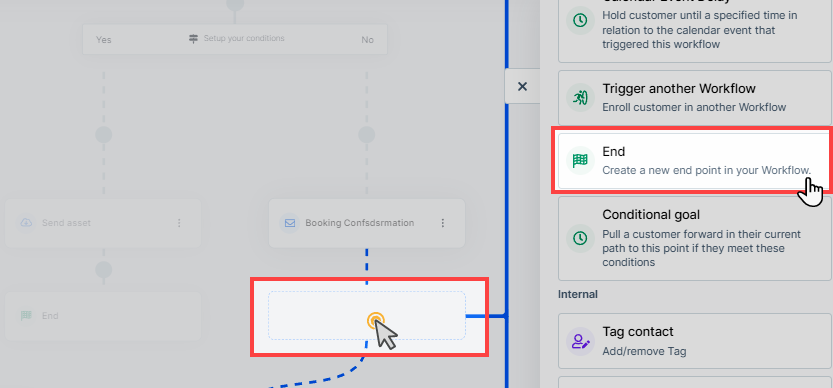
Click on the Plus Icon (+) in your workflow editor.
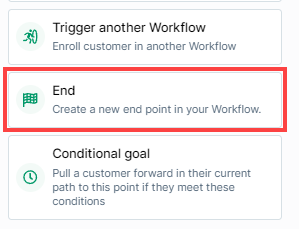
In the right-hand panel, select the “End” option under the “Internal” category.
No Configuration Required:
This step effectively stops the branch at that point, ensuring that no further actions are taken in that branch. The “End” step does not require any additional configuration. Once added to the workflow, it automatically functions to terminate the branch where it is placed.
When to Use the “End” Step
Multi-Branch Workflows: In workflows with multiple branches created by the “Conditional Split Path” or “Split Test” steps, the “End” step ensures that each branch concludes correctly without allowing contacts to rejoin the main workflow.
Conditional Split Path Workflows: When using the “Conditional Split Path” step to create multiple branches based on different conditions, the “End” step is essential to terminate branches that meet or fail to meet certain criteria.
Split Test Workflows: When conducting A/B tests using the “Split Test” step, the “End” step can be used to close one or both branches after the test is complete.
Preventing Loops: The “End” step helps to prevent any unintended loops where contacts might otherwise re-enter the main workflow after completing a branch.