ClickFunnels automatically generates sitemaps for any domains connected to your account. This functionality helps improve SEO by making it easier for search engines to discover your pages. In this article, we will explain how the automatic sitemap generation works, the types of pages included, and how to access your sitemap.
Requirements
An active ClickFunnels account
A domain or subdomain connected to the workspace
How Automatic Sitemap Generation Works
ClickFunnels automatically creates a sitemap.xml file for each domain connected to your account. This file lists the URLs of all indexable pages associated with your domain, ensuring that search engines can efficiently crawl and index them.
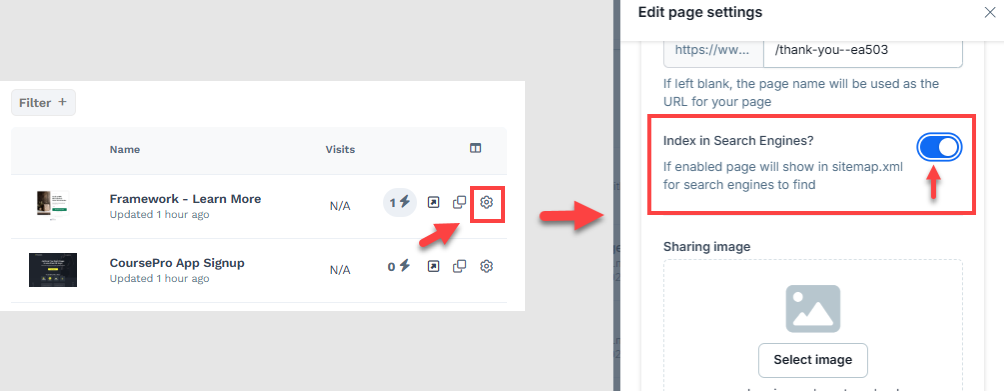
The Index In Search Engines option must be toggled in the page settings to ensure a page is included in the sitemap. This option signals search engines to include the page in their crawl and allows ClickFunnels to add it to the sitemap.
Benefits of Automatic Sitemap Generation
No Manual Effort Required: ClickFunnels eliminates the need for manual sitemap generation and hosting. The platform automatically creates and hosts the
sitemap.xmlfile for your connected domain.Regular Updates: The sitemap is dynamically updated whenever changes are made to your pages, such as adding new content, updating existing pages, or changing URL paths.
Improved SEO Efficiency: Automatic sitemap generation ensures that search engines can always access the latest structure of your site, improving crawl efficiency and indexing.
Page URLs Included In the Sitemap
The following types of page URLs are included in the automatically generated sitemap:
Site pages
Blog pages
Store pages
Course pages
Funnel pages
Blog Post
Landing pages
Community page
Product URLs
How to Ensure a Page is Indexed
To ensure that pages related to the categories above are indexed in your sitemap, you can enable or disable indexing directly from the page settings. Follow these steps:
Locate the page you wish to edit. For example, if you have created a landing page and want it included in your sitemap, find the landing page in your list.
Access to the page settings.
In the settings panel, locate the Index In Search Engines option.

Toggle this setting on to include the page in your sitemap and allow search engines to index it.
Toggle it off if you do not want this page indexed.
Save your changes by clicking the Save button.
Note:
ClickFunnels updates the sitemap in real time. However, changes made in the workspace may take up to 5-10 minutes to be reflected in the sitemap to ensure proper synchronization and caching efficiency for your domain.
How to Access Your Sitemap
You can view your sitemap by appending /sitemap.xml to your domain. For example:
If your domain is
https://www.example.com, your sitemap URL will behttps://www.example.com/sitemap.xml.
To confirm the sitemap’s content, open this URL in your browser. The sitemap will display all indexed pages for your domain in XML format, which search engines use to understand your site's structure.
ClickFunnels also generates a robots.txt file for each connected domain. This file is a key component for search engine crawlers, as it instructs them on interacting with your ClickFunnels pages. It also includes a directive pointing to the sitemap URL, making it easy for search engines to locate it automatically.
To view the robots.txt file for your domain, append /robots.txt to your domain URL. For example:
If your domain is
https://www.example.com, yourrobots.txtfile URL will behttps://www.example.com/robots.txt.
When you access the robots.txt file in your browser, you will see a reference to your sitemap URL (e.g., Sitemap: https://www.example.com/sitemap.xml). Use this information to confirm that your sitemap is properly linked.
Note:
The
robots.txtandsitemap.xmlfiles associated with your connected domain are hosted and managed automatically in the backend by ClickFunnels. You cannot edit these files directly, as they are dynamically updated based on your page settings.
Example Sitemap
Here is an example of how a sitemap may look:
<urlset xmlns="http://www.sitemaps.org/schemas/sitemap/0.9">
   <url>
      <loc>https://www.example.com/</loc>
      <lastmod>2024-01-01</lastmod>
   </url>
   <url>
      <loc>https://www.example.com/blog</loc>
      <lastmod>2023-12-20</lastmod>
   </url>
   <url>
      <loc>https://www.example.com/funnel-step</loc>
      <lastmod>2023-11-15</lastmod>
   </url>
</urlset>
Tips for SEO Optimization
Enable Indexing For Relevant Pages: Only toggle on the Index In Search Engines option for pages you want search engines to discover.
Keep Content Updated: Regularly update your page’s content to reflect the latest information. The sitemap’s
lastmodtag will notify search engines of recent updates.Use Descriptive URLs: Ensure your page URLs are descriptive and include relevant keywords for better SEO performance.